
Introduction
Welcome to our DIY enthusiasts' guide to creating a practical and stylish solution for your bicycle storage needs! If you're tired of cluttered corners and tangled handlebars, it's time to take matters into your own hands. In this blog post, we're excited to show you how to construct a wooden bike rack that not only keeps your precious rides organized but also adds a touch of craftsmanship to your space. The best part? You can achieve all of this for less than £50.
Whether you're a cycling aficionado or simply looking for a cost-effective way to store your family's bicycles, this DIY project offers a budget-friendly alternative to store-bought racks. We understand that space and aesthetics are essential considerations when it comes to storage solutions. That's why our step-by-step guide will not only help you build a functional bike rack but also allow you to tailor it to your preferences, ensuring it seamlessly integrates into your home.
Gone are the days of leaning your bikes against walls or cramming them into cramped corners. With a little creativity, basic tools, and a modest budget, you can craft a wooden bike rack that showcases your DIY prowess. So, roll up your sleeves, gather your materials, and let's dive into the world of DIY bike rack construction, where practicality meets affordability in the most satisfying way possible.
Planning and Preparation
Planning and preparation are vital steps when undertaking a DIY project like building a wooden bike rack for under £50. Proper planning sets the foundation for a successful and smooth project execution. Here's why planning is crucial and a breakdown of the materials and tools needed, along with a budget breakdown:
Importance of Planning and Preparation:
1. Accurate Measurements: Planning allows you to measure accurately and determine the exact dimensions for your bike rack. This ensures that the rack fits your bikes and the available space perfectly.
2. Material Selection: Planning helps you choose cost-effective materials that suit your budget without compromising quality. It also allows you to estimate quantities accurately, minimizing wastage.
3. Tool Readiness: By planning ahead, you can ensure that you have all the necessary tools on hand. This prevents delays and interruptions during the construction process.
4. Minimize Errors: Adequate planning helps you foresee potential challenges and make adjustments beforehand, reducing the likelihood of mistakes that could lead to additional expenses.
5. Budget Management: Effective planning allows you to stay within your £50 budget by making informed choices about materials, finishes, and optional tools.
6. Efficient Execution: When you have a clear plan in place, you can work more efficiently and confidently, saving time and minimizing frustration.
Materials and Tools Needed:
Materials:
1. Wooden boards (3 pieces of 2x4 ft pine board)
2. Screws or nails
3. Sandpaper (medium and fine grit)
4. Wood glue (optional)
5. Paint, stain, or sealant (optional)
Tools:
1. Measuring tape
2. Pencil or marker
3. Saw
4. Drill
5. Screwdriver
6. Hammer
7. Clamps (optional)
8. Sanding block or electric sander
9. Safety glasses
10. Ear protection
11. Gloves
12. Level
Budget Breakdown:
1. Wooden boards (3 x £6): £18
2. Screws or nails: £5
3. Sandpaper: £2
4. Wood glue (optional): £2
5. Paint, stain, or sealant (optional): £10
6. Tools (assuming you already own some): £0
7. Total Cost: £37
By planning and preparing carefully, you can ensure that you have all the necessary materials and tools before starting your DIY bike rack project. This approach not only streamlines the process but also keeps the cost under £50, allowing you to build a practical and visually appealing bike rack that meets your needs without breaking the bank.
Design Selection
Designing a DIY bike rack for under £50 involves considering your available space, the number of bikes you need to store, and your personal preferences. Below are different design options for a wooden bike rack, along with their advantages and disadvantages to help you make an informed choice:
1. Wall-Mounted Bike Rack:
Advantages:
- Space-Saving: Wall-mounted racks utilize vertical space, making them ideal for compact living areas.
- Easy Access: Bikes are conveniently stored off the ground, allowing for quick and easy access.
- Aesthetic Appeal: Wall-mounted racks can become a decorative element in your space, showcasing your bikes as functional art.
Disadvantages:
- Requires Wall Space: You need an available wall with sufficient space for installation.
- Installation: Mounting the rack securely requires drilling into the wall, which might be a concern for renters or those without DIY experience.
2. Freestanding Bike Rack:
Advantages:
- No Installation: Freestanding racks do not require wall mounting, making them suitable for renters or anyone not wanting to drill holes.
- Portability: You can easily move the rack around as needed, which is convenient for reconfiguring spaces.
- Accessibility: Freestanding racks offer easy access and can accommodate multiple bikes.
Disadvantages:
- Floor Space: These racks can take up floor space, so ensure you have enough room for placement.
- Stability: Depending on the design, some freestanding racks might not be as stable as wall-mounted options.
3. Vertical Bike Rack:
Advantages:
- Efficient Use of Space: Vertical racks store bikes in an upright position, utilizing minimal floor space.
- Easy Loading and Unloading: Bikes can be easily lifted onto the rack, which is especially helpful for heavier bikes.
- Aesthetically Pleasing: Vertical racks create a neat and tidy appearance, displaying your bikes vertically.
Disadvantages:
- Height Limitation: Ceiling height might restrict the use of vertical racks for taller individuals or low-ceiling spaces.
- Wall Anchoring: Some vertical racks might need wall anchoring for stability.
4. Horizontal Bike Rack:
Advantages:
- Easy Access: Bikes can be rolled onto the rack, making loading and unloading effortless.
- Space Efficiency: Horizontal racks utilize wall space effectively and can accommodate multiple bikes in a row.
- Customizable: You can adjust the spacing between bike slots based on your bike sizes.
Disadvantages:
- Wall Space Needed: Like other wall-mounted options, horizontal racks require available wall space.
- Handling Heavier Bikes: Depending on the design, lifting heavier bikes onto the rack might be more challenging.
Ultimately, the choice of design depends on your space, preferences, and the number of bikes you need to store. Consider factors such as available wall space, ceiling height, ease of access, and the overall aesthetic you want to achieve. Each design has its unique advantages, so weigh these against your needs to make an informed decision. Whichever design you choose, building your own wooden bike rack under £50 allows you to create a practical storage solution that perfectly suits your space and style.
Measuring and Cutting
Creating a DIY bike rack requires accurate measurements and precise cuts to ensure the components fit together perfectly. Here's a step-by-step guide on how to measure and cut the wooden boards for your bike rack, along with safety tips for using a saw:
1. Gather Your Materials and Tools:
- Wooden boards
- Measuring tape
- Pencil or marker
- Saw (circular saw, miter saw, or handsaw)
- Safety glasses
- Gloves
2. Measure the Components:
- Begin by determining the dimensions of the bike rack components. Common components include the base, frame supports, and horizontal bars.
- Use a measuring tape to measure the required length, width, and height of each component.
- Mark the measurements with a pencil or marker directly on the wooden boards. Double-check your measurements for accuracy.
3. Cutting the Wooden Boards:
- Once you've marked the measurements, it's time to cut the wooden boards.
- Choose the appropriate type of saw for the job. A circular saw or miter saw is ideal for straight cuts, while a handsaw can be used for smaller cuts or if you don't have power tools.
4. Safety First:
- Put on safety glasses to protect your eyes from wood chips and debris.
- Wear gloves to protect your hands while handling the wood and saw.
5. Straight Cuts with a Circular Saw or Miter Saw:
1. Place the wooden board on a stable surface, such as a workbench or sawhorses.
2. Adjust the saw blade to the desired depth, ensuring it won't go beyond the thickness of the wood.
3. Line up the saw's cutting guide with your marked measurement on the wood.
4. Hold the board firmly with one hand and use the other hand to operate the saw.
5. Start the saw, guide the blade along the cutting guide, and make a smooth, steady cut.
6. Using a Handsaw:
1. Clamp the wooden board securely to a work surface to prevent movement while cutting.
2. Hold the saw with a firm grip and use long, smooth strokes.
3. Follow your marked measurement and cut along the line, maintaining a steady pace.
7. Tips for Clean Cuts:
- Go slowly and steadily to maintain control over the saw.
- Let the saw do the work—avoid applying excessive force.
- Keep the blade aligned with the cutting guide for straight cuts.
- If using a handsaw, use a sawing motion and let the teeth do the cutting.
8. Double-Check and Sand:
- After cutting, double-check the dimensions of the cut components against your measurements.
- Use sandpaper to smooth any rough edges or surfaces, ensuring a clean and safe finish.
Accurate measurements and clean cuts are essential for a successful DIY bike rack. By following these steps and safety guidelines, you can confidently create components that fit together seamlessly. Remember to work carefully and patiently, ensuring the accuracy of your measurements and the cleanliness of your cuts.
Assembly Steps
Step 1: Building the Base and Main Frame:
1. Prepare Your Components:
- Gather the cut wooden boards for the base and main frame.
- Place the base boards on a flat surface, ensuring they're aligned properly.
2. Assemble the Base:
- Position the shorter boards perpendicular to the longer boards, creating a rectangular base shape.
- Align the corners and edges, ensuring they're flush.
- Use screws or nails to attach the boards securely at each corner.

Step 2: Adding Support Bars:
1. Attach Vertical Support Boards:
- Measure and mark the desired height for the vertical support boards on the corners of the base.
- Attach the vertical boards using screws or nails to create the upright main frame.
2. Add Horizontal Support Bars:
- Measure and mark the desired distances between the vertical support boards.
- Attach the horizontal support bars at the marked heights to complete the main frame.

Step 3: Creating Slots or Hooks:
1. Adding Slots:
- Measure and mark the positions for the bike slots on the horizontal support bars.
- Use a saw or chisel to carefully create slots where the bike wheels will rest.
2. Attaching Hooks:
- Alternatively, you can attach hooks to the horizontal bars to hang the bikes by their frames.
- Ensure the hooks are securely screwed or nailed in place.

Step 4: Stabilization:
1. Check for Stability:
- Once the slots/hooks are in place, check the stability of the bike rack.
- Ensure the rack is level and doesn't wobble.
2. Optional Stabilization:
- If needed, you can attach diagonal braces from the corners of the base to the vertical support boards to enhance stability.
3. Finishing Touches:
- Sand any rough edges or surfaces for safety and aesthetics.
- If desired, apply paint, stain, or sealant for a polished look and added protection.

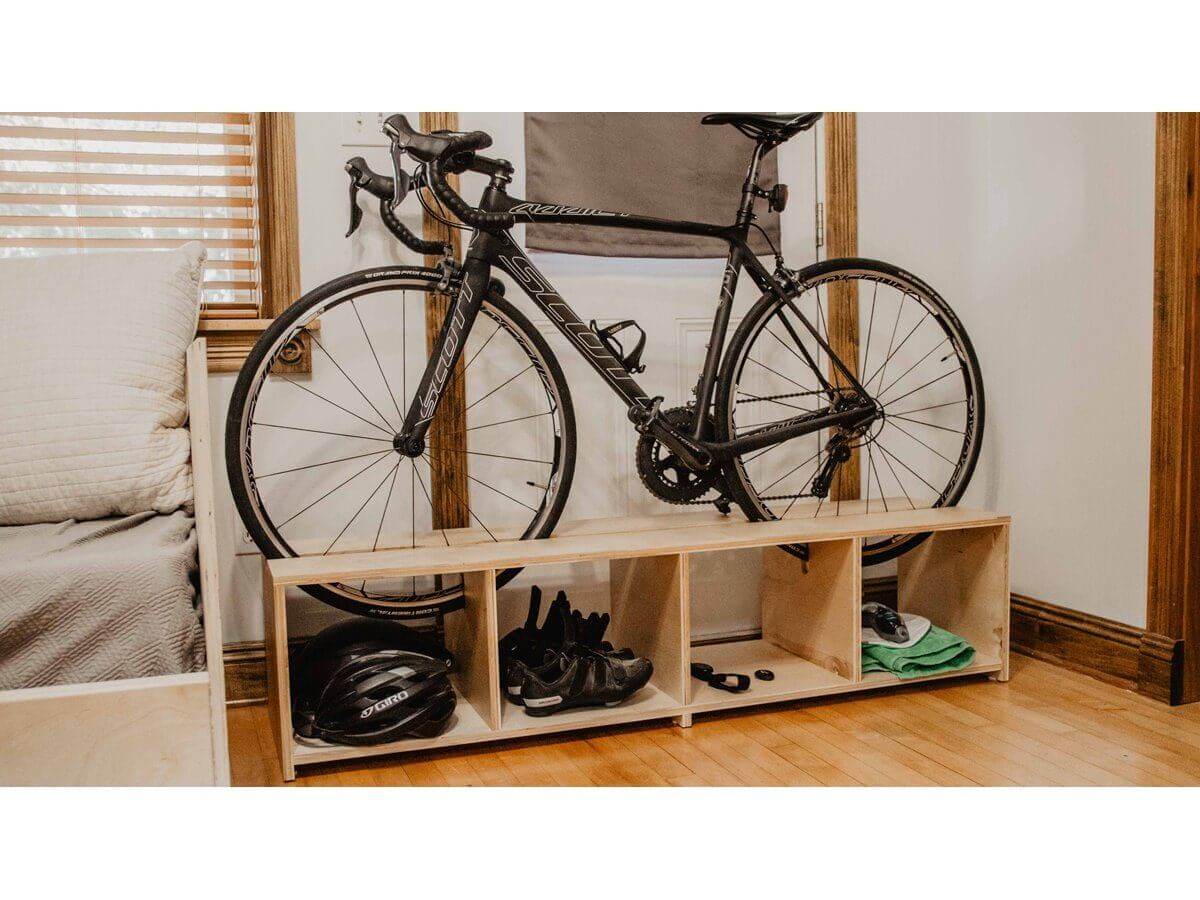
Final Result:
Congratulations! You've successfully assembled your DIY bike rack. The base and main frame provide a sturdy foundation, the support bars securely hold the bike wheels, and the slots or hooks ensure your bikes are neatly stored. The final step of stabilization ensures the rack is safe and ready for use.
Remember to always consider safety precautions and take your time during each step. With careful assembly, your DIY bike rack will not only be a functional storage solution but also a proud accomplishment of your crafting skills.
Sanding and Finishing
Sanding and finishing are critical steps in building a wooden bike rack that not only looks great but also ensures safety and longevity. Let's delve into the importance of sanding, provide a guide to the sanding process, and discuss optional finishing touches:
Importance of Sanding:
Sanding serves multiple purposes in woodworking projects like a bike rack. It helps to:
- Smooth rough edges and surfaces, preventing splinters and potential injuries.
- Remove any imperfections, blemishes, or unevenness in the wood.
- Provide a clean canvas for applying finishes, ensuring better adhesion and a professional appearance.
Guide to Sanding:
1. Choose the Right Sandpaper:
- Start with a coarser grit sandpaper (around 80-120) to remove any significant roughness or imperfections.
- Progress to finer grits (150-220) for smoothing and achieving a polished surface.
2. Sanding Process:
- Safety Gear: Wear safety glasses and a dust mask to protect your eyes and lungs.
- Secure the Workpiece: Clamp the wooden components securely to a work surface to prevent movement while sanding.
- Initial Sanding: Begin with the coarser grit sandpaper and sand in the direction of the wood grain.
- Even Pressure: Apply even pressure while sanding, covering the entire surface. Avoid pressing too hard, as it might lead to uneven sanding.
- Transition to Finer Grits: Progress to finer grits as the wood becomes smoother. Always sand in the direction of the grain.
- Smooth Edges: Pay special attention to edges and corners to eliminate sharp edges that could cause splinters.
3. Inspect Your Work:
- After sanding, run your hand over the surface to check for smoothness. Look for any remaining rough patches, and sand those areas further if necessary.
Optional Finishing Touches:
1. Staining:
- Staining enhances the natural colour of the wood while adding a layer of protection.
- Choose a stain that complements your space. Apply evenly and follow the manufacturer's instructions.
- Wipe off excess stain after applying, allowing it to dry completely.
2. Sealing:
- Sealing the wood with a clear sealant or polyurethane finish protects it from moisture, dust, and scratches.
- Apply multiple thin coats for optimal protection. Sand lightly between coats for a smooth finish.
3. Painting:
- Painting your bike rack adds colour and customization. Use outdoor-grade paint for durability.
- Apply multiple coats, allowing each coat to dry before applying the next.
4. Decals or Stencils:
- Add a personal touch with decals or stencils. Position them where they won't interfere with bike placement.
- Use outdoor-grade decals or add a clear sealant to prevent peeling.
5. Protective Pads:
- Attach adhesive-backed pads where bikes contact the rack to prevent scratches on both the rack and bikes.
By sanding and finishing your wooden bike rack, you ensure a safe and polished final product. Smooth surfaces prevent injuries, while finishes protect against wear and add aesthetics. With attention to detail and patience, your bike rack will not only serve its functional purpose but also become a stylish addition to your space.
Conclusion
In conclusion, crafting your own wooden bike rack for under £50 is not only an economical solution but also a rewarding DIY project that offers numerous benefits. Throughout this blog post, we've explored the step-by-step process of building a functional and stylish bike rack that suits your space and needs. Let's recap the key takeaways:
- Planning and Preparation:
We emphasized the significance of careful planning and preparation to ensure a successful DIY bike rack project. Taking the time to measure accurately and gather the right materials and tools is essential for a smooth process.
- Safety and Clean Cuts:
We provided insights into safely cutting wooden boards using a saw, ensuring clean cuts for precise assembly and an aesthetically pleasing end result.
- Assembly and Design Options:
Whether constructing a base, framing the main supports, or customizing the design to your liking, we offered detailed guidance for assembling a sturdy and functional bike rack. We explored different design options such as wall-mounted, freestanding, vertical, and horizontal racks to cater to various preferences and spaces.
- Budget-Friendly Approach:
We highlighted the affordability of this project, detailing the materials and tools needed while ensuring the total cost remains under £50, making it an accessible endeavor for anyone on a budget.
- Maintenance and Personalization:
Understanding the importance of sanding, finishing, and regular maintenance helps ensure the longevity and safety of your bike rack. Additionally, we delved into personalized touches like paint, decals, and hooks, encouraging readers to let their creativity shine and make the bike rack truly their own.
The benefits of building a wooden bike rack under £50 are immense. Not only does it save you money, but it also offers a chance to express your creativity, learn new skills, and create a functional piece that suits your individual style. As you embark on this DIY adventure, you'll find a sense of accomplishment in constructing a unique, budget-friendly bike rack that not only stores your bicycles efficiently but also adds character to your living space.
So, why not seize the opportunity to build your own bike rack, tailor-made to your preferences and requirements? Unleash your creativity, embrace the satisfaction of craftsmanship, and enjoy the practicality of a budget-friendly storage solution. Get started on your DIY journey and revel in the joy of owning a bike rack you've personally designed and built. Happy crafting!